Fitness Blog

Push-ups, Planks, and Modifications

Struggling with push-ups is a real thing, just ask my sister. She was recently asking me why they were so hard, and how you ever get better at them. But when she described what she was doing it was either struggling to do even just two or three regular plank position push-ups where her core would collapse and her elbows would flare out, or doing a ton from her knees that were super easy.

The answer, which is true for most exercises, is finding modifications.

It’s also important to understand the positions you’re attempting to achieve and finding ways to isolate them individually. The problem with attempting to “muscle through” standard push-ups when you don’t actually have the strength to do them is that your form is going to be awful. You’re just going to reinforce an improper movement pattern since you can’t achieve the correct one, or you’re going to hurt yourself, and maybe even both. So here are some ideas for how to progress your push-ups, as well as brush up on the movement itself.

Let’s quickly look at the Push-Up itself.

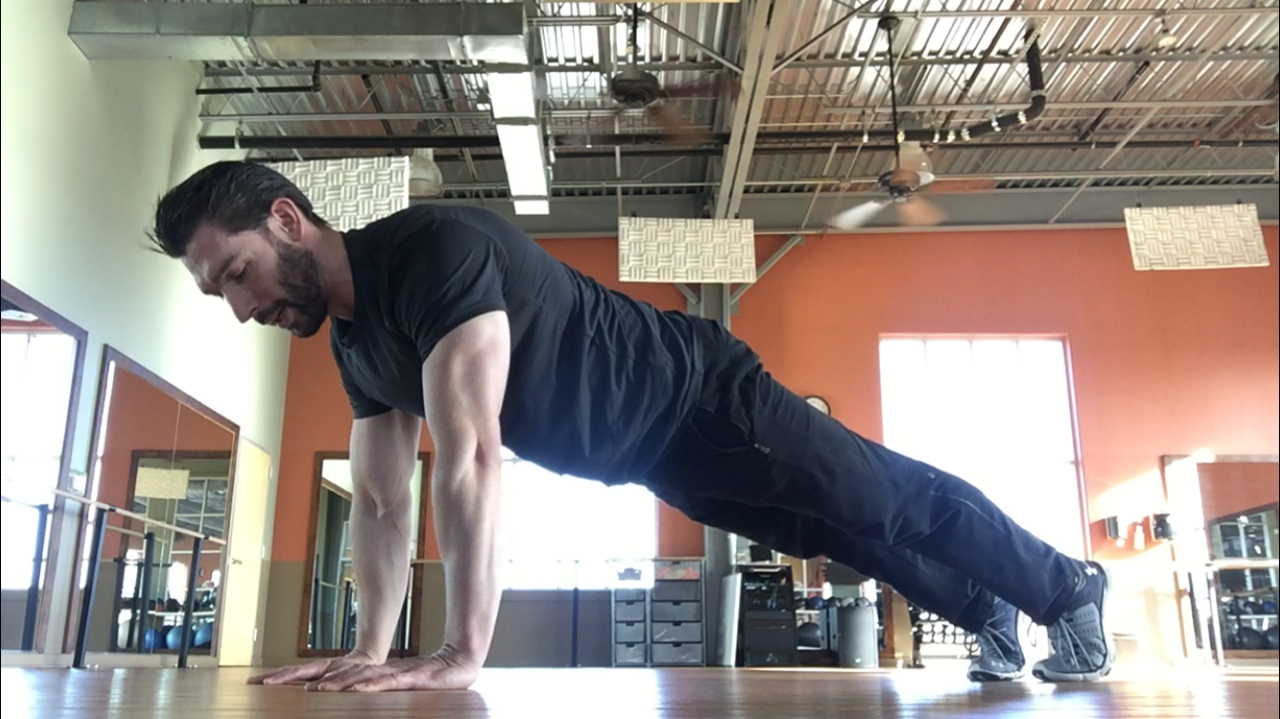
The start position for a standard push-up is a plank. Arms are straight, hands are under your shoulders, head is in neutral position, hips and core are engaged, and your body should be relatively straight from your shoulders to your heels. You don’t want your back arching so your stomach is falling to the floor, but you also don’t want your hips hiked up behind you, so your butt is sticking up in the air. A solid plank should be the first position you are able to get into. If you can’t get into this position then doing a push-up is a tomorrow problem.

Pretty much every exercise has a start position and a finish position. If you can get into both of those positions then the movement between the two should be relatively easy.

The focus then becomes on moving more weight, doing more reps, or increasing the tempo. The finish position for a push up is elbows bent and creating about a 45 degree angle between your body and elbows from your armpits, and your body braced a few inches above the floor. Hips and core are still fully engaged. If you could draw a straight line from one thumb to the other it should run across the middle of your sternum, or what some refer to as nipple line. A push-up is just alternating between these two positions in a controlled, stable manner. “Screwing” your hands into the floor (generating tension with the floor by applying clockwise pressure with the right hand and counterclockwise pressure with the left) will help stabilize your shoulder by engaging your lats and shoulder muscles as the head of the humerus bone rotates in the socket.

Now let’s get to the tips and modifications.

·        Planks – If you struggle to do a plank then this is where you begin. You need to have the arm, shoulder, core, and chest strength to be able to maintain a plank if you want to be able to do a push-up.

·        Incline Position Push-Ups – If you have access to a squat rack then you can set the bar to the height you need in order to be able to perform a push-up while practicing your form. With this method, “screwing” your hands in becomes “bend the bar. You can also try using a chair or the back of a couch, or anything that elevates your hands off the ground so you can work on building up your strength.

·        Negative Position Push-ups – With this you will start in plank position and slowly lower yourself to the ground. From there, bend your knees and put them on the ground with your feet in the air and do a knee push up back to the top. Get back into plank position and slowly lower yourself down again. These will most likely be difficult but will help a lot in building strength.

·        Finish Position Hold Push-ups – These start with you laying flat on the floor, hands just outside your chest, elbows 45 degrees off your body, and thumb line going across the center of your sternum. Push your self about 3 inches off the floor and try to hold the finish position of a push-up for 3 seconds, aiming for 10-12 reps. The time and reps should increase as you get stronger.

·        Up Downs – This method is essentially alternating between a forearm plank and a straight arm plank. Start in a forearm plank and then alternate between the arm that helps push you up into a straight arm plank.

·        Plank Walks – Any kind of movement in plank position will help strengthen your arms, shoulders, chest, and core. You can plank walk side to side, forward and backward, rotate in a circle, anything you want, get creative. As long as you’re in control of your movement and maintaining a stable plank position. I suggest doing this as a timed exercise for 30-60 seconds.

·        Dumbbell Press and Tricep Extensions – A very straightforward way to build up the strength you need for a push-up is to work the muscles that are part of the movement. Doing flat bench or incline bench dumbbell presses will build up the push muscles in your chest, shoulders, and arms. And then you can specifically target your triceps by doing tricep extensions to both increase their strength, which will help with your push-up, but also tone your arms. Toning bonus FTW!

 It’s likely that there are plenty more modifications out there besides these, and maybe there are even some that you come up with yourself. Be consistent, keep practicing, and make note of your progress so you know when to challenge yourself more. It may seem daunting at first, maybe even impossible, but you will definitely see progress and will end up fully capable of doing a push-up.

What Does It Mean to Hip Hinge: An Introduction to Deadlift

A Breakdown of Hip Hinge and Deadlifting

Successfully executing a deadlift is akin to having all the stars align. For anyone who has struggled with this form and mastered it, you probably know exactly what I mean. For whatever reason this movement seems to come very easily to some people, but for others it is weeks, if not months, of practice. Part of this problem is due to tight hamstrings or hips, leading to difficulty in sensing the lengthening and shortening of that muscle group. Another obstacle can be underactive glutes, or a lack of glute strength, that also leads to difficulty in sensing the movements and engaging with the muscle group. Both of these are pretty straightforward fixes: stretch, foam roll, activate, and strengthen these muscle groups. The more active muscle fibers you have operating, the easier it is for your brain to communicate with them and vice versa.

Outside of these basic obstacles though is probably the biggest one of all: understanding what it means to hip hinge. I’ve mentioned before that sometimes terminology can sound good, but not carry any actual meaning for people. In other words, if someone asked you to explain what it means to hip hinge, could you? If not, or if you just want to double check your own understanding, keep reading.

Hip Hinge. It sounds simple enough. But a combination of tight or weak muscles, and a less than complete understanding of how to produce this movement can lead to a lot of frustration. So let’s break it down in the simplest terms. The main area being affected are your hips, so there’s the hip part. And in the same way a hinge on a door functions that gives us the hinge part; your hips are hinging. In my view the confusion mostly tends to rise out of one particular area: your back. Let me quickly explain.

If you simply looked at a hinge on a door you would see two flat, metal pieces, joined in the middle by intersecting, round pieces that form a cylindrical tube, with a pin that inserts into that tube to hold the pieces together. The center tube with the pin through it allows the two metal pieces to pivot off of one another, so when attached to a door and the frame, the door can open and close. Right now you’re probably about to stop reading this article because, duh Jamie, we know how a door works. But hear me out.

With your body, your thighs are one metal plate, your back is the other, and your hips are the tube in between with the pin through it. Your thighs, or more specifically the femur bone in them, are hard and strong and straight just like the metal plate. Your back on the other hand is ribs and spine, which not only is made up of interlocking vertebrae that can bend and move, but your spine itself is curved as it travels through your torso and inserts into the back of your pelvis (the SI joint). Therefore, maintaining a straight, flat back that might resemble a solid metal plate is going to depend entirely on your muscles to maintain control, stability, and straightness.


You can probably look around your local gym or almost anywhere on the internet and see people rounding their back as they perform a deadlift. This is generally a lack of awareness but can also be from a lack of strength, or trying to lift a weight that is too heavy for them. Or all of the above. The point is though: don’t be that person. Using a mirror at first is a great way to ensure that you are maintaining a straight back as you hip hinge. But beyond that it is pretty essential that you know what it feels like so you can ditch the mirror. In my view the easiest way to familiarize yourself with a hip hinge is to imagine you’re doing a hamstring stretch, except you have to keep your back completely flat and straight as you push your butt out behind you. Holding a broom stick or pvc pipe on your back as you do this and maintaining full contact with it along your back can help. As you do this you should feel the muscles of your hamstrings begin to lengthen and stretch. Stop before you get to a point where you can no longer control the stretch because the next part is important. In the same way your arm does a bicep curl, the bicep muscle lengthens when the weight is away from you, then the muscle shortens and contracts to “curl” the weight in, that’s basically how your hamstrings operate too. From that lengthened position, with your back straight and your butt pushed out behind you, pull yourself back to an upright position by contracting and shortening your hamstrings. The pull is through your glutes and hamstrings, not by arching and pulling through your low back. This is essentially a hip hinge.


While practicing this you’ll probably discover that there are various iterations of a hip hinge. Technically, when you squat you are performing a hip hinge. You load your glutes and hamstrings for stability as you lower into the squat, but then due to the flexion of your knees it becomes more of a push movement through your quads and glutes to drive back to standing. Similarly, with deadlift you might have been practicing a straight-leg deadlift in order to familiarize yourself with a hip hinge, but in order to generate more power and strength in a traditional deadlift, there is going to be some degree of flexed knees in order to create a higher concentration of overlapping muscle fibers in the hamstrings, leading to a stronger pull. If that’s confusing, think back to doing a bicep curl. If you had your arm completely straight and you put a heavy dumbbell in your hand, chances are you’re going to struggle to curl that dumbbell in from a straight arm position. But if you bent your elbow slightly and then put that same dumbbell in your hand, it would be much easier to curl it due to the extra overlap of muscle fibers. If you want to learn more about that, do a search on the actin and myosin filaments in a sarcomere.

 Hopefully this has cleared up any confusion about what it means to hip hinge and how the movement applies to lifting and really, picking up anything in general. If you can master the hip hinge and apply it appropriately to deadlift posture when picking things up, you’ll end up engaging your back in a position of stability while your glutes and hamstrings are the muscles that actually lift whatever it is you have off the floor, or out of the back of your car or truck, and basically anything of that nature. Understanding and mastering this movement will save you a lifetime of back pain and strain, and make your glutes and hamstrings strong, functional, and sexy!